


In this tutorial I'll go over analyzing your proposed conversation, tailoring a conversational script, preparing and implementing it as a voice app using Dasha AI platform.
/ We're in closed beta now. This is a repost of two posts form our blog. If you want to try a conversational AI for a pet project, head over to community.dasha.AI to join our developer community; you'll be welcomed and provided instructions on how to get your API key + you'll have the support of all our CS engineers. /
AI as a service in the context of Dasha AI
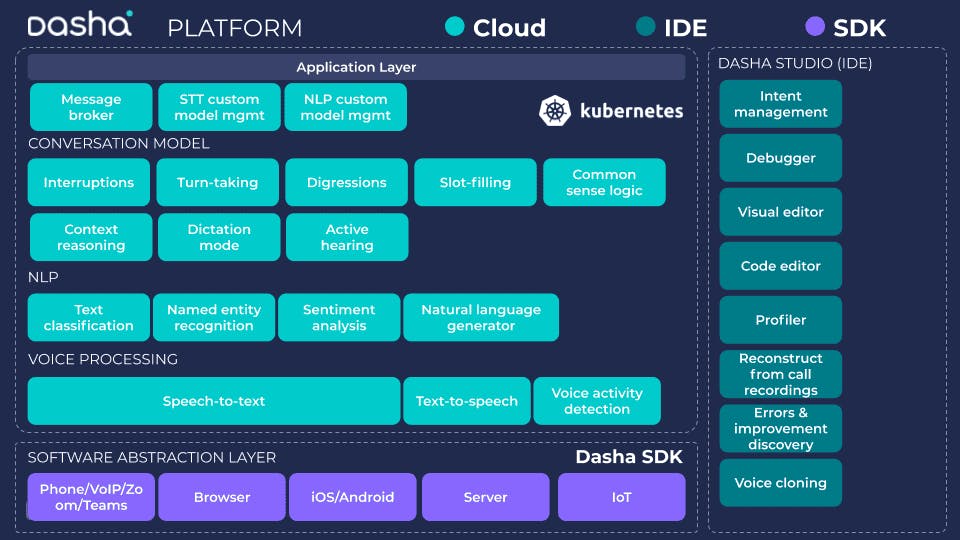
A key value proposition of Dasha AI Platform suite of tools is letting you use the latest and greatest in conversational AI without knowing a single thing about machine learning, neural networks or AI for that matter. To this end, we provide AI as a service of the Dasha Cloud Platform. Here is the architecture at a glance, for more please refer to the Platform Overview section of the documentation. Everything you see in the Application Layer is the AI as a service component.
Preparing your script and adapting it for the AI conversational interface
For the purpose of this article we will take a simple conversation that I want to automate with an AI app. It’s an app that will replace an administrator at your favorite restaurant. You call the restaurant, the AI picks up, takes your order and tells you when to come by to pick it up. Of course, we may need to answer a few questions along the way. To figure out how the conversation usually goes, we sit down with the current receptionist. Here is the conversation, as he conveyed it to us.
Administrator: Hi, this is John at Acme Burgers Main Street location. Would you like to place an order for pick-up? Customer: Yes, please. Administrator: What can I get for you? Customer: I’d like a burger, some fries and a milkshake. Administrator. Perfect. Let me just make sure I got that right. You want a burger, fries and a milkshake, correct? Customer: That’s right. Administrator: Great. Will you be paying at the store? Customer: Yes, please. Administrator: Perfect. Your order will be ready in 20 minutes at Acme Burgers Main Street location. Please go straight to the pick up counter. Can I help you with anything else? Customer: No, that’s it. Thanks. Administrator: And thank you for placing your order with us. Have a lovely day and enjoy!
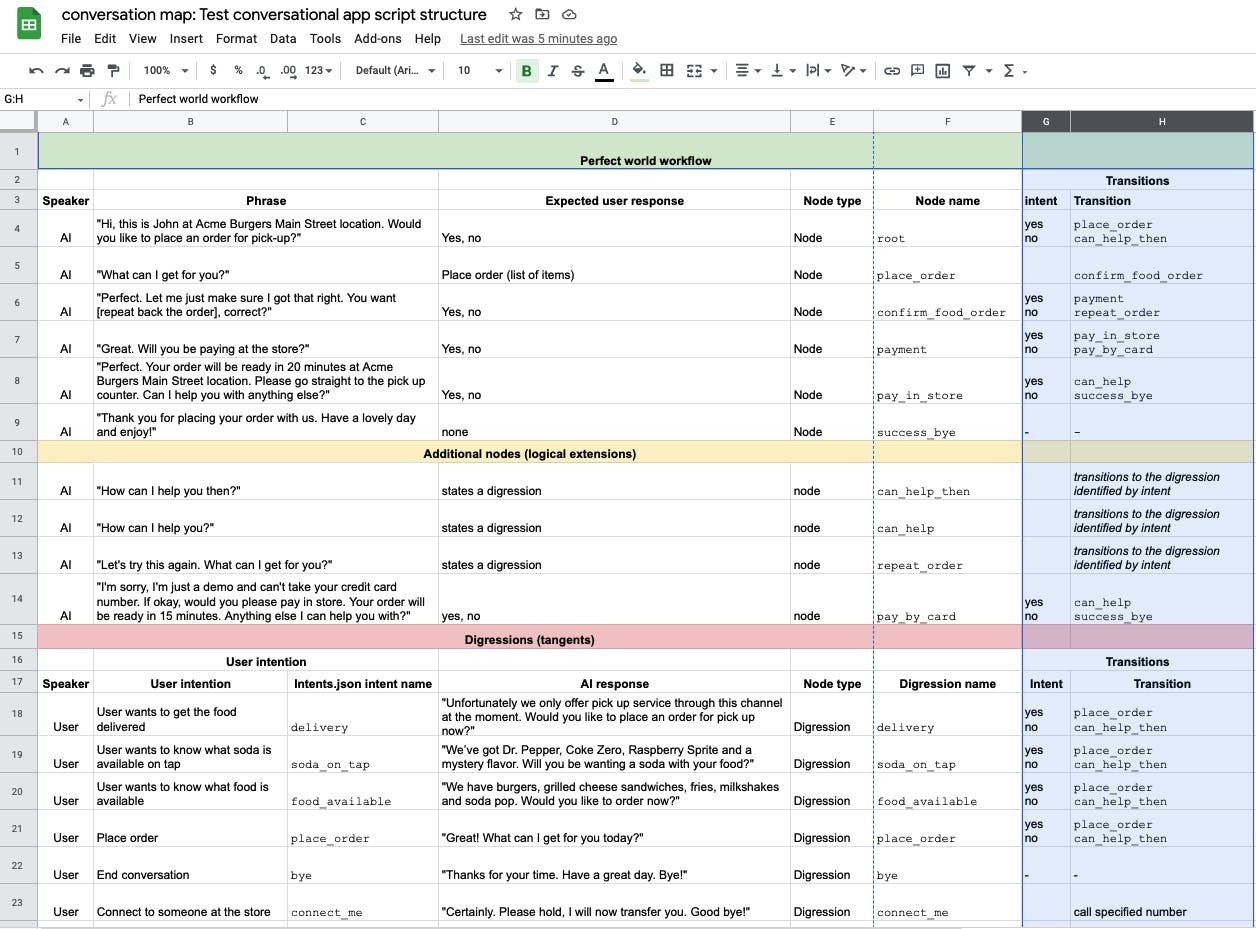
The Administrator also told us that sometimes customers ask about food availability, delivery, ability to eat in, among other things. Let’s structure this script for your use in your conversational AI app development. I like to use a table to do this, as it helps me to get a bird’s eye view of the app I’m building. You can copy this spreadsheet to your Google Drive here or download it as an Excel spreadsheet to use on your machine.
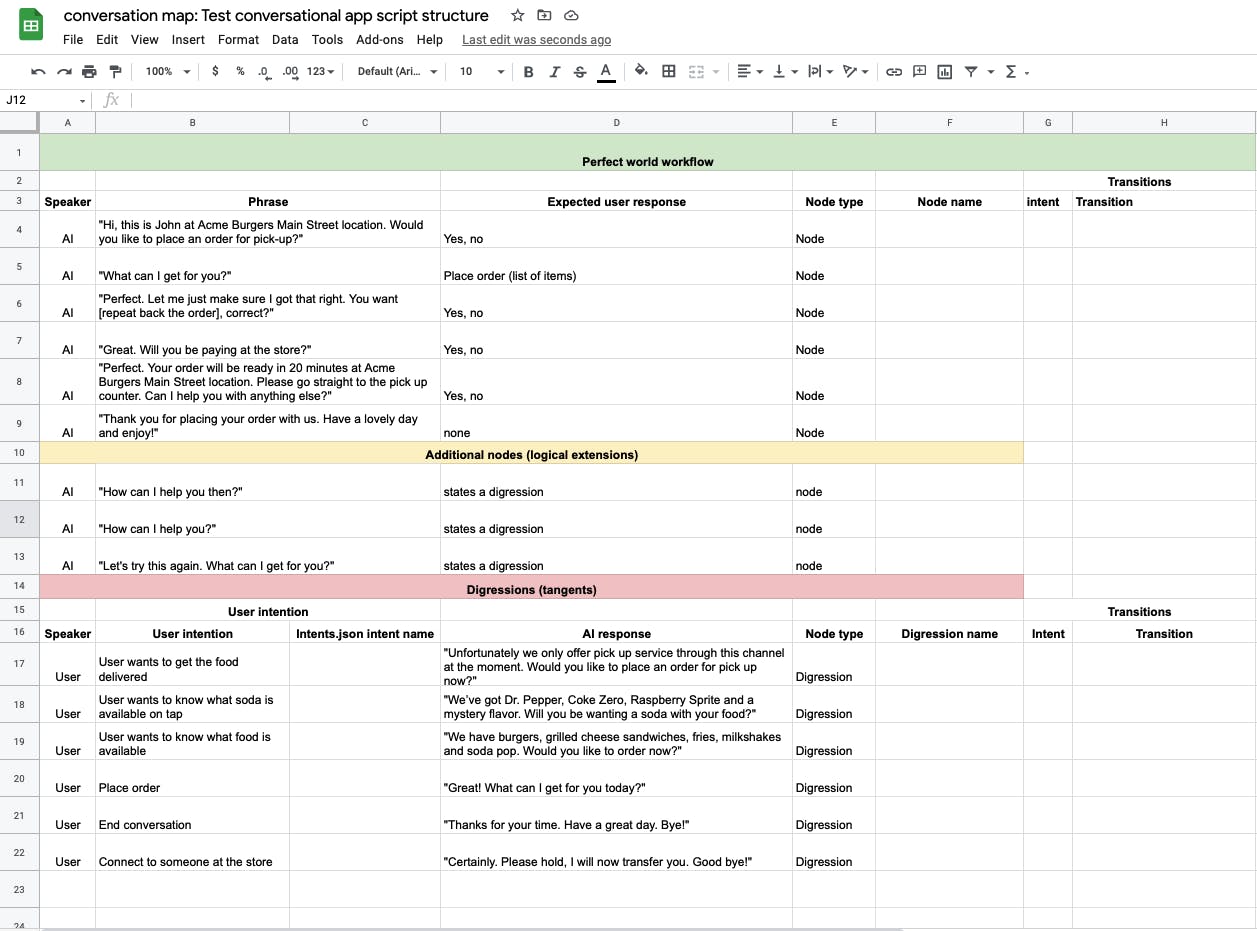
In order to build your conversational AI app, break your conversation into three main areas:
- Perfect world workflow - that’s the script the administrator shared with us earlier. Note that all nodes here are node which means that they can only be reached from another node or digression
- Additional nodes (logical extensions) - these are talking points that will have to come up based on some of the responses to the script above. In this case, if the user answers “No” to “Would you like to place an order for pick-up?”, a logical response will be “How can I help you then?” Since this is not described in our perfect world workflow, we place this node in the logical extensions section.
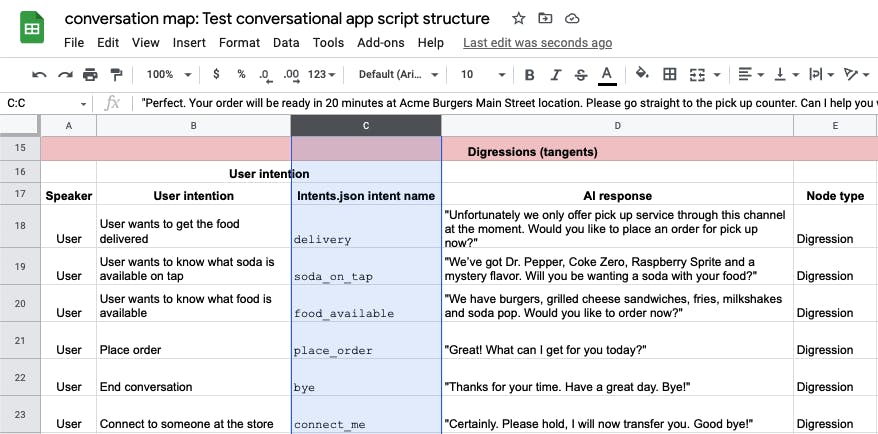
- Digressions (tangents) - our hypothetical restaurant administrator told us that sometimes customers ask about things outside of the script. In order to sound human-like on the phone (pass the Turing test), the AI has to be prepared to respond to these digressions. Here we prepare it for such. Note that, unlike a node, a digression can be brought up at any point in the conversation. Please note column C. It references an intent name. Intent classification categorizes phrases by meaning. This is how the AI app makes sense of what the user is saying to it. You can train your AI app to recognize the specific intent that you are looking for in the phrases of the user. To do so, you modify the data.json file and, you guessed it, you need to assign a specific name to each intent. In this spreadsheet we fill out intent names in Column C.
Pro tip: here's a post explaining the difference between nodes and digressions in detail. You can find it here. Also Iliya wrote a detailed explanation of how to use intent classification.
Here is our spreadsheet with the intent names filled out:
Planning and structuring your conversational AI app
You should have noticed that a few of the columns in our spreadsheet are empty. Let’s see what they are and what their significance is to building your conversational AI app.
Let’s start with column F.
Node name - here you will name the node; you will use the name in your DashaScript code
Digression name - by the same token, you will name your digression here
I have gone through and named all of our nodes and digressions. You can see the result here (here is the spreadsheet link again just in case )
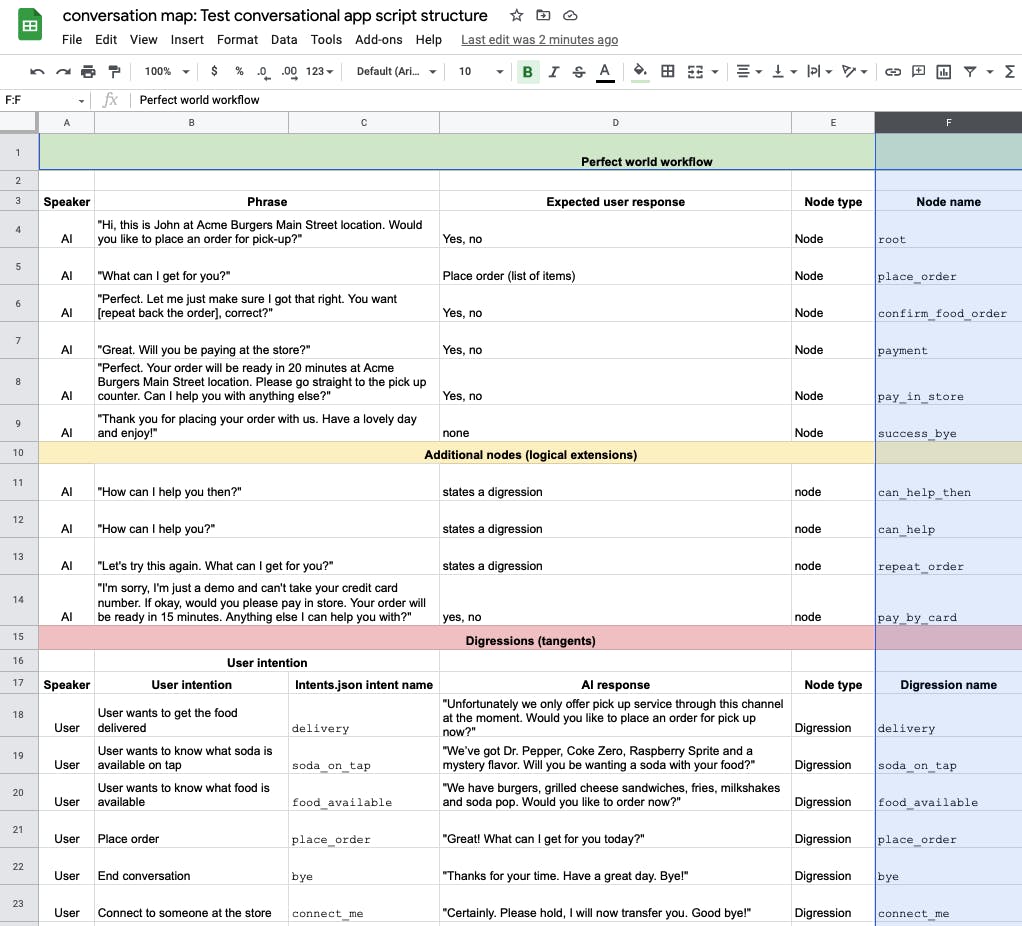
We’ve now got the node and digression names. By the way, you probably noticed that digression names and intent names are identical. They don’t have to be but for ease of mapping I like to keep them identical.
Note that we have a node place_order and a digression place_order. We need to duplicate the functionality because you can only transition into a node, yet at any point in the conversation the user might request ordering food. You can have the same name for a digression and a node.
Let’s map transitions (we’re getting to the fun part). The funnest (and most helpful) part about mapping transitions is realizing how many logical nodes are missing from our initial vision of the conversation map.
So now we have specified exactly what action the AI app should take upon any given user response. Bear in mind that we are not mentioning digressions here because the user can bring the digression up at any point in the conversation. That’s why they are digressions.
Building your conversational AI app - intents and entities
Now that we have our conversation mapped out, implementing it using DashaScript and JSON in Dasha Studio is a breeze.
First, you’ll want to open an existing simple Dasha app. I will use this one as the example. If you need instructions on how to get your Dasha Studio set up, you can refer to the second section of this post.
Once you’ve got the app opened in Visual Studio Code, make sure you have the following files open: main.dsl, intents.json. You will also want to open the visual graph editor - you can refer to it, as you are building your app, for a bird's eye view of transitions.

Perfect. I usually like to start with my intents. It helps me to think through things properly. Oh! And I just realized that we forgot to map our Yes and No intents. There is a system function for sentiment negative/positive, however for an app where Yes and No may be expressed in less than usual ways, I suggest creating custom intents.
Open Intents.json, select all and delete. Now paste in this code to get you started.
{
 "version": "v2",
 "intents":
 {
   "yes":
   {
     "includes": [
       "yes",
       "correct",
       "sure",
       "for sure",
       "absolutely",
       "right",
       "righto",
       "yep",
       "you got it",
       "I would"
     ],
     "excludes": [
       "fuck off"
     ]
   },
   "no": {
     "includes": [
       "no",
       "hell no",
       "definitely not",
       "wrong",
       "incorrect",
       "I do not",
       "I don't",
       "I would not"
     ],
     "excludes": [
     ]
   }
 },

     "entities":
     {

     }
}
You will now need to use the same format to fill out of all the intents that you had defined in the conversation map spreadsheet. You are stating the name of the intent and then listing examples of phrases that should be interpreted as signifying this intent and examples of phrases that should always be excluded as signifying this intent. Intents.json is the data you provide to train the intent classification neural networks in Dasha Cloud. For most intents 5-10 examples are enough, for some you may need more.
When you’re done you should have something like this.
You probably noticed the section “entities” which is something that we have not discussed. Named entities are a way to extract specific data from speech. In this case, we are using named entities to get the user’s order over the phone. To use entities, we have to define them and state examples in the JSON file. To gain a better understanding of using Named Entity Recognition in Dasha, read Iliya’s write up here. Here is the code we will use for the entities:
"entities":
 {
   "food":
   {
     "open_set": true,
     "values": [
       {
         "value": "burger",
         "synonyms": ["burger", "hamburger", "a burger", "a hamburger", "a tasty hamburger"]
       },
       {
         "value": "fries",
         "synonyms": ["fries", "some fries", "french fries", "delicious fries"]
       },
       {
         "value": "milkshake",
         "synonyms": ["milkshake", "shake", "a milkshake", "strawberry milkshake", "a tasty milkshake"]
       },
       {
         "value": "hot dog",
         "synonyms": ["hot dog", "french dog", "a hot dog", "a french dog", "big dog"]
       },
       {
         "value": "grilled cheese",
         "synonyms": ["grilled cheese", "cheese sandwich", "grilled cheese sandwich", "a grilled cheese sandwich", "a cheese sandwich"]
       },
       {
         "value": "coke",
         "synonyms": ["soda", "coke", "a soda", "a coke"]
       }
     ],
     "includes": [
       "(burger)[food], (fries)[food] and a (milkshake)[food]",
       "(burger)[food], (fries)[food] and a (coke)[food]",
       "(grilled cheese)[food], (fries)[food] and a (milkshake)[food]",
       "(grilled cheese)[food], (fries)[food] and a (milkshake)[food]",
       "(hot dog)[food], (fries)[food] and a (milkshake)[food]",
       "(hot dog)[food], (fries)[food] and a (coke)[food]",
       "I'd like a (burger)[food], (fries)[food] and a (milkshake)[food]",
       "I'd like a (burger)[food], (fries)[food] and a (coke)[food]",
       "I'd like   (grilled cheese)[food], (fries)[food] and a (milkshake)[food]",
       "I'd like a (grilled cheese)[food], (fries)[food] and a (milkshake)[food]"
     ]
   }
 }
Synonyms are various ways in which the user might identify the entity value. Includes are ways in which the sentence, containing the entity value, might be phrased.
Go ahead and paste the section above to replace the “entities” section already in the JSON file. You may want to add some variations in phrasing to further train the neural network powering your conversational AI’s classification engine.
Setting up the nodes and digressions
Now, switch over to the main.dsl file. First we need to declare a function that will receive the data collected from the conversation with the user. Later in the conversation we will use this function to read the data back to the user to confirm the order. Here is the function declaration statement and here is what the first 5 lines of your new app should look like:
context
{
    input phone: string;
    food: {[x:string]:string;}[]?=null;
}
Now, let’s move to the nodes. Your first task is to transfer over all the nodes and to map out their transitions. Start with node root. You will want to change the text to reflect what we had defined in the conversation map and you will want to map the transitions accordingly. As the outcome, you should have this statement:
start node root
{
   do
   {
       #connectSafe($phone);
       #waitForSpeech(1000);
       #sayText("Hi, this is John at Acme Burgers Main Street location. Would you like to place an order for pick-up?");
       wait *;
   }
   transitions
   {
       place_order: goto place_order on #messageHasIntent("yes");
       can_help_then: goto can_help_then on #messageHasIntent("no");
   }
}
Your second node will be place_order. Here we need to use the NLU control function #messageHasData to collect named entity data that we have defined in our intents.json file. This is what it will look like. As you recall, we declared $food to be a data array variable in line 4 of the file. Now we are populating it with the data the user provides.
node place_order
{
   do
   {
       #sayText("Great! What can I get for you today?");
       wait *;
   }
   transitions
   {
      confirm_food_order: goto confirm_food_order on #messageHasData("food");
   }
   onexit
   {
       confirm_food_order: do {
       set $food = #messageGetData("food");
      }
   }
}
Refer to your conversation map. The next step from here is to confirm the food order. In this node we will read the data collected and stored in variable $food back to the user.
node confirm_food_order
{
   do
   {
       #sayText("Perfect. Let me just make sure I got that right. You want ");
       var food = #messageGetData("food");
       for (var item in food)
           {
               #sayText(item.value ?? "");
           }
       #sayText(" , correct?");
       wait *;
   }
    transitions
   {
       order_confirmed: goto payment on #messageHasIntent("yes");
       repeat_order: goto repeat_order on #messageHasIntent("no");
   }
}
With these three examples you will be able to create all the other nodes, as are required by your conversation map.
Now on to the digressions. As discussed previously, digressions are nodes that can be called up at any point of the conversation. They are used to make the conversation more human-like. (for more on digressions, read this post)
Let’s start with the delivery digression.
digression delivery
{
   conditions {on #messageHasIntent("delivery");}
   do
   {
       #sayText("Unfortunately we only offer pick up service through this channel at the moment. Would you like to place an order for pick up now?");
       wait *;
   }
   transitions
   {
       place_order: goto place_order on #messageHasIntent("yes");
       can_help_then: goto no_dice_bye  on #messageHasIntent("no");
   }
}
You can use the same framework to recreate all the other digressions, as you planned to in the conversation map. The only one to pay attention to will be the digression place_order. Make sure you reuse the code from node place_order to properly utilize named entities for data collection.
When you are done, your main.dsl file should look something like this.
You can get the code to the entire app in our GitHub repository here.
Testing the conversational AI app you have just built
Type npm start chat into your terminal. Give the cloud platform a minute to process the training data and train your intents and entities. A chat will launch within terminal.
Depending on the route you take, it may go something like this:
Type npm start number into your terminal, where number = your phone number in the international format e.g.: 12813308004. You will get a call, when you pick it up give it a second and the AI will begin the conversation, just as you had instructed it to do.
And that's about it. Have fun playing with our tech, also be sure to pop into our developer community. And let me know how I did in the comments. First post and all.